|
VoxTone WIN/MAC
VoxTone with Microsoft
Outlook
ORDER NOW!
|
Make Your Computer Talk to You!
The VoxTone is not just limited to a ringtone for your cellphone. Just as you can change the ringtone on your cellphone, you can personalize the sounds that your computer makes when different things happen, such as when you turn on your computer and Microsoft Windows XP starts, when you connect to a wireless network, when you receive an instant message, and for dozens of other events.
Imagine when logging on and entering your operating system environment, you’ll hear your computer Greet you in your own name or nickname, short phrase, sentence, or any name for that matter!
Apply the VoxTone to various compatible WIN or MAC programs as well. Use your imagination to see how far you can take the VoxTone exclusive sound alert designed by you! Wow! Your peers and co-workers!
**Please see below the simple process of changing your default OS sounds and alerts for Windows and Mac:
1. |
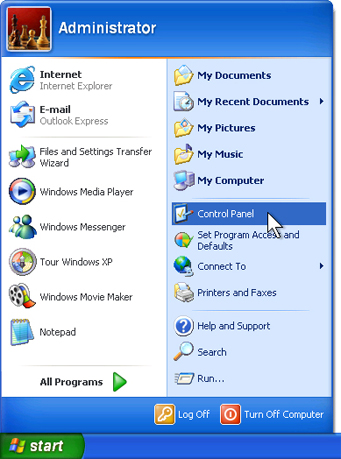
Log on to your computer as an administrator.
Click Start, and then click Control Panel.
|
| |
|
| |
|
2. |
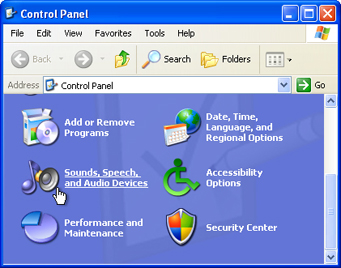
Click Sounds, Speech, and Audio Devices. |
|
|
3.
|
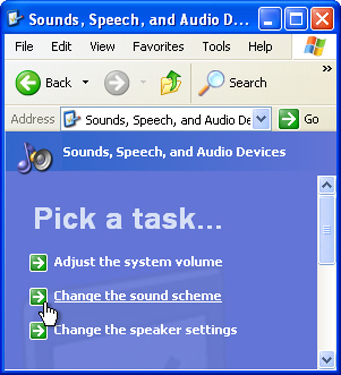
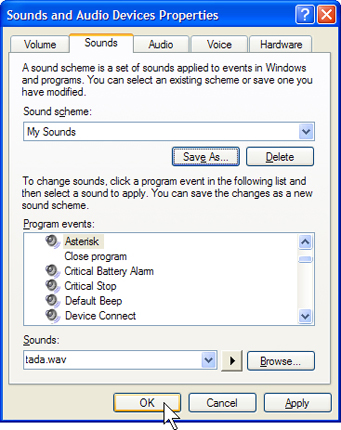
Click Change the sound scheme. The Sounds, Speech, and Audio Devices Properties dialog box appears.
|
|
 |
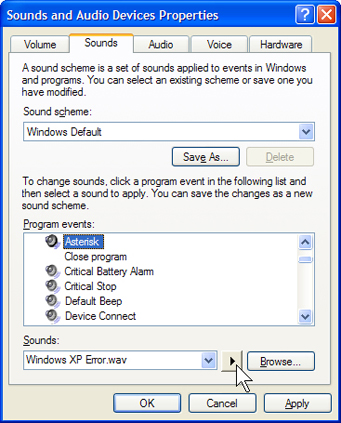
4.
|
In the Program events list, click an event. Then, click the Play button to listen to the sound currently assigned to the event. The sound probably sounds familiar. If you decide to change it to your VoxTone alert, you'll hear your VoxTone sound in place of the current sound.
|
| |
 |
|
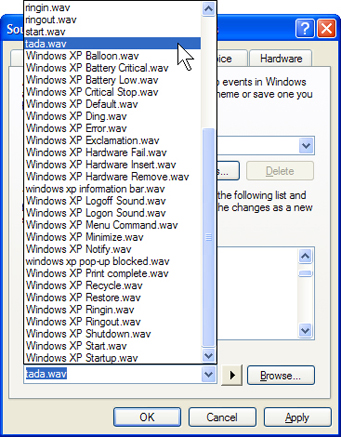
5.
|
To change the sound, click the Sounds list down arrow, and select a different system sound. To choose a VoxTone Alert that you have saved onto your computer, click the Browse button, select the sound wherever you saved it on your computer, and then click OK. Click the Play button again to preview the VoxTone.
|
| |
 |
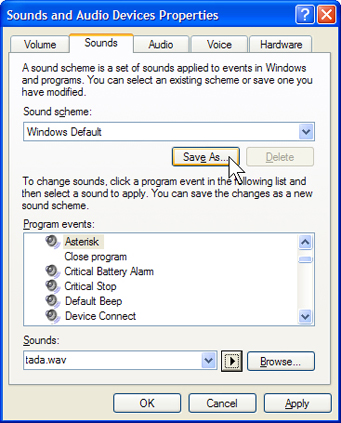
6.
|
Repeat steps 4 and 5 to change more sounds assigned to program events. When you are satisfied with your sounds, click Save As.
|
| |
 |
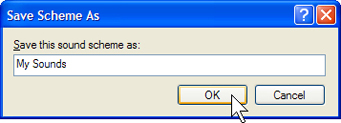
7.
|
In the Save Scheme As dialog box, type a name for your scheme, and then click OK.
|
| |
 |
8.
|
In the Sounds and Audio Devices Properties dialog box, click OK.
|
| |
 |
| |
|
Mac OS X: Installing VoxTones
If you'd like to add your own VoxTones to Mac OS X, you can as long as your audio file is in AIFF format and has the ".aiff" extension appended to the filename. (Note: The suffix ".aif" is not sufficient in Mac OS X 10.1.5 and earlier.) We will send you a .wav format of the VoxTone Via email, which you will have to convert into aiff file format. You can use an audio application, such as iTunes or QuickTime Pro, that can convert sound files between formats.
- Here's how to add your own alert sounds to your system.
- Locate the VoxTone converted AIFF sound file you want to use in the Finder.
- From the File menu, choose New Finder Window to open another Finder window.
- Select your Home folder in the new Finder window.
- Open the Library folder.
- Open the Sounds folder—you should now be in ~/Library/Sounds, where the tilde (~) represents your Home folder.
- Drag your VoxTone AIFF file from your first Finder window to the Sounds folder in the second Finder window.
- From the Apple menu, choose System Preferences.
- In the resulting window, click Sound to display its pane.
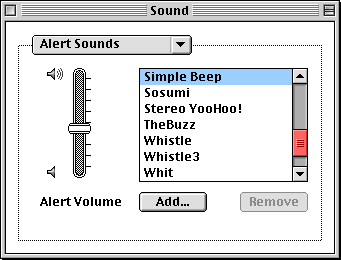
- Click the Sound Effects tab.
Your sound should appear in the alert sound list; just select it to put it in use.
Tip: If you'd like to make your VoxTone (s) available to other users on your computer, create a VoxTones folder, put it in the Library folder at the root of your system (/Library), and drag in your VoxTone AIFF files.
All you need to do is highlight the VoxTone you would like to use and close the window. As you highlight a sound it will play for you.
- Open iTunes (it's in the Applications folder).
- From the iTunes menu, choose Preferences.
- Click the Importing button.
- From the Import Using pop-up menu, choose AIFF Encoder.
- Click OK.
- Hold down the Option key and from the Advanced menu, choose Convert Selection to AIFF.
- In the resulting Convert window, navigate to and select your audio file.
- Click Choose. iTunes begins to convert the file.
- After iTunes finishes the conversion, drag the AIFF file from the iTunes library to either /Users/username/Library/Sounds or /Library/Sounds (if you are using Mac OS X 10.1.5 or earlier, be sure to change the filename extension from ".aif" to ".aiff").
You can then delete the audio file from your iTunes library if you wish (just select the file and press Delete).
Note: If you're using Mac OS X 10.0 and cannot use iTunes, you can use QuickTime Player to do the conversion as long as you've upgraded to QuickTime Pro, and the file is one that QuickTime Player can open and play.
Using QuickTime Pro to convert audio files to AIFF format
Note: Certain files that work with the Mac OS 9 version of QuickTime Player may not work with the Mac OS X version, and vice versa. For example, if you want to bring a sound from the Mac OS 9 System suitcase (also known as a "System 7 Sound") into Mac OS X, you must make the AIFF conversion in the Mac OS 9 version of QuickTime Player—not the Mac OS X version. If needed, you can open the Mac OS 9 version of QuickTime Player in the Classic environment of Mac OS X.
- Open QuickTime Player (it's in the Applications folder).
- From the File menu, choose Import. QuickTime 7 Pro users: From the File menu, choose Open File.
- In the resulting dialog, navigate to and select the sound file that you wish to convert.
- Click Open.
- From the File menu, choose Export.
- In the resulting dialog, choose a location to save the new file (the Desktop or your Documents folder are good choices).
- From the Export pop-up menu, choose Sound to AIFF.
- In the Save As field, check the file name to be sure it ends with a ".aiff" extension.
Click Save.
|